27 December 2011

Welcome to Our Humble Abode

In addition to our work on the second bedroom and the living room, we've also been working on the entryway. 

Before.

After.

We picked up the little sandstone owl bookends at the Portobello Road Market in London. 

Aren't they the sweetest little things? They survived the transatlantic flight wrapped about ten times in our sweaters. 

I also found this classic British telephone decoration at Hobby Lobby this past weekend:
LOVE IT!

We've been working on the house since March 2011, and I'm just now feeling like bits and pieces of it are coming together to look like a real house. Here's to 2012 and more house updates/ decorating!

The Evolution of the Den

Of all of the rooms in our house, the den is probably the closest to being finished. We figured that most people who come over will see this room, so we concentrated our efforts there.

The den had humble origins.
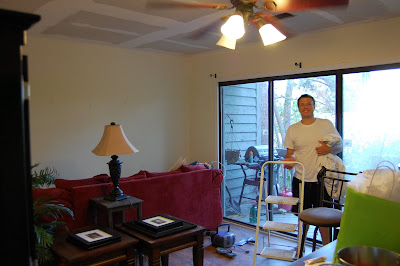
Before the curtains were up. Pretty much the first day we moved in.
Then, we decided to scrape the popcorn ceiling. NOT my favorite project.
Here it is, in all of its newly painted glory (Valspar Churchill Hotel Wheat, for those of you interested). The furniture is mostly in place:

Next comes a rug from Target to tie everything together.


For Christmas, I got a desk and a papasan. Yay for more storage and seating!
Spot the puppy!

Second Bedroom, 2.0

Whoooooo's happy about our second bedroom/ office? 

We are!

In large part to some amazing Christmas gifts from my sister, the second bedroom is turning into something worth looking at.

Behold it in its original glory:

This is a particularly rough picture of the room, as it was right before painting. I promise, we don't usually keep our house looking crack-den chic.

After painting the pale yellow walls to a grey-beige, and a visit to Pier One for pillows and lamps:

Sloooooowly, sloooooowly, we're getting there! Note the completely empty bookshelves--a sight that may never happen again in our household.


AND NOW! Here is it today: 


The design rundown:
  • New white 5-shelf bookshelves (Walmart. $25/each)
  • Sleeper sofa (free. Donated by a friend)
  • Glass lamps (Pier One. On sale for $50/each; regularly $75/each)
  • Velvet pillows (Pier One. On sale for $20/each)
  • Long bird pillow (Pier One. $40/each)
  • Blue and white chain pillows (Target, two years ago. $15/each)
  • White sheer curtains. (Bed Bath and Beyond, two years ago. Given as wedding gifts)
  • Owl mirror (Earthbound Trading Company. $30)
  • Owl tryptich (Pier One. Given as gifts)

11 December 2011

Master Bedroom: In the Works

When we bought the house, before the master bedroom was painted: 


After the bedroom was painted--with no decorations and with the bed in the middle of the room:

Then, the bed was moved over to the side of the room, giving us more room on the left:


To come: more wall art, a bookcase, and a chair! It may be taking a while to tackle all of these projects, but I'm excited to see them slowly come together!

02 July 2011

Kitchen Decorations

For the kitchen (which is our next big project to tackle), I have BIG ideas for the decorations. There's one long wall that screams out for something fun and funky. For some reason, I've been hung up on a focal point that has the following two requirements:
1. It must be of epic proportions. No 8x10 picture for our kitchen wall.
2. It must have something to do with subway or bus signs. Don't ask me where this came from. Just go with it. :)

A few ideas that I've been tossing around:
A reproduction of a bus blind in London from the Transportation for London Museum Shop. When I lived there, I used to take the 11 bus all of the time (my stop: Chelsea, World's End). If I can't live in London, I can bring London to me!

Another poster from TfL Museum: I adore the bold black and white graphics on this one. It's London but done in the coolest way possible. Both of the TfL posters come in a variety of sizes so I could get a BIG one like I really want.

Or, what about these subway sign panels from Flying Junction store on Etsy?


27 June 2011

Oh, Happy Day! {The Living Room Before and After}

The ceilings have been scraped. They have been painted.

The walls have been repainted. The furniture has been put back in place.

And we have a new and improved den!

Before:
Notice the unfinished ceilings and the horrible yellow paint that is more suitable for a nursery than a den

AFTER!
The living room is on its way to joining the 21st century! I love the new paint color (Valspar Churchill Hotel Wheat). New lamp shades and a new rug are on their way!

25 June 2011

Ceilings: Before and After

KITCHEN
Before 
when the kitchen ceilings still had their popcorn-ness
and when the old (horribly dim) florescent light still existed in the kitchen

Kitchen
AFTER
shiny, smooth ceilings
shiny new light fixture!


I don't have a picture of the living room before, so use your imagination!!

Living Room
AFTER

I think we are ALL so glad to be done with this project--it was messy and time-consuming, but 150% worth it.

On to painting the downstairs tomorrow!!

19 June 2011

Tearing My Hair Out

We're to the point in our kitchen project where we just want to take a wrecking ball to the whole thing. Will it never be done??

The last round of ceiling sanding is going painfully slow since Landon broke his hand last week. We discovered sagging wallpaper under the kitchen paint, so that's had to come down, too. The wallpaper didn't release like it should, so we've had to sand and peel the wallpaper backing off veeeeeerrrry slooowwwly.

So, even though we've been working on this project for several days, you can't really tell that we're making that much forward movement.

Eleven days until Landon's friend's bachelor party descends on the house! EEK!

17 June 2011

Tearing up the Place

Our house has gone from bad to worse. In the process of prepping the ceiling for primer and paint, we discovered that there is (was) wallpaper under the layers of paint in our kitchen. Hideous, blue and brown striped wallpaper. Yuck!

So, in addition to sanding the ceiling last night, I also had to begin the process of ripping the painted wallpaper down so that our new paint will go on smoothly (lest we create even MORE work for ourselves). Our house honestly looks like some homeless squatters should be living it in! (Pics to come!)

And to make things even worse, Landon broke his right hand falling off of a ladder Tuesday night, so I'm the only able-bodied one for the time being. What ELSE could happen???

I just want to finish all of the painting by the time Landon has some friends down in July for a bachelor party (not his own, but a friend of ours). If we're done painting, I can at least put the furniture back in place before they get here.

13 June 2011

Halftime Report: De-popcorning the ceilings

As I mentioned in my earlier post, Landon and I have decided to upgrade the ceilings from the popcorn ceilings in all their 1987-glory to smooth, painted ceilings--hopefully, bringing another portion of our house into the 21st century (watch out kitchen and bathrooms: you're next!).

Landon is just finishing up downstairs with the scraping, and we'll be able to move onto the spackeling and  sanding tomorrow or the next night, followed soon by the actual painting of the ceiling.

Here's where we were as of two hours ago:
ALL of our furniture from the downstairs--the pictures, the kitchen table, the couch and anything else you can imagine--is now crammed into the 450 square feet or so of our living room. We're doing anything but living in it, as you may imagine.

The clean, non-popcorn ceiling in the den. Oh, how lovely it will look when we have painted it white.

Still left to do: the kitchen (the white portion of the ceiling) in contrast to the already scraped foyer.

Darn you, popcorn ceilings

Our house looks like a construction zone.

We're not constructing something--we're destructing. The popcorn ceiling, that is.

Our house, which was built in the mid-80s, has the knobbly popcorn ceiling that was all the rage at that time. Landon and I can't stand it.

We've been planning on a kitchen remodel, but our kitchen remodel budget isn't quite there just yet, so we decided to take on some more budget-friendly jobs while we're waiting to do the kitchen. The popcorn removal is just the first in a series of wall/ceiling tasks we plan on taking on over the next few months which will include: sanding and painting the ceiling white, repainting the entire downstairs (kitchen, living room and stairway) a darker khaki to replace the pale yellow that is currently there, repainting the trim and putting up crown moulding in the living room and kitchen.

Hopefully, once we're done with these jobs, it will be time for the kitchen...our downstairs may be looking like a construction zone for quite some time!

01 June 2011

Taming the Backyard, One Paver at a Time

We actually finished this project a while back, but I never posted pictures. Landon and I have a pretty small backyard, but we still want to make it a space we could enjoy.

We already had a fire pit that we needed a space for. It was pretty large, as far as fire pits go, so we knew the patio also had to be large enough to accommodate it.


Landon and I went to Lowe's and found some paving stone that had a bit of design on them--something different than the traditional brick. We paired these larger pavers with rows of darker brick, just to break up the entire pattern a bit.

The first thing we had to do once we had all of the materials was measure the exact width and length of the patio, using twine and posts. This grid (which we leveled) then helped us to figure out how much to dig out of the existing yard. The entire patio had to be tilted towards the back of the yard (and thus, away from the house), so the front portion needed to be dug a bit deeper (about 1/4") than the back. The digging commenced...and continued and continued. For several afternoons after work.

Our yard is, luckily, pretty sandy (being right near the marsh), so we didn't have to buy additional sand to put down as a base layer for the pavers. We just separated the dirt from the sand as we dug, placing the sand in a pile to be reused in the next step.

After our patio hole was dug deep enough, we began the process that took us through the rest of the project: add sand, pack sand until level, add stone firmly against those around it, lightly pound paver with mallet to secure, check to make sure it was level. Repeat until finished.

Luckily, my dad was able to come over after work during the paver laying stage, so the work went by much quicker with the three of us. The little girls who live next door were our biggest cheerleaders, commenting each night on how much we accomplished and how good it looked!

About two-thirds of the way done. The finished product has another strip of pavers that are 2-wide to balance each end. 

A close up of the finished product!
I will post pictures when we get some lawn furniture to go on it. Right now, we're just using the chairs from my old outdoor dining set (which has, admittedly, seen better days) in order to crowd around the fire pit. As we're in no hurry, I think we'll hold out for some great deals at the end-of-summer sales that will be going on in a few months. We also still need some grass in our backyard, which will give it that extra oomph and take it from being a dirt pit to a place where we can actually entertain!

27 May 2011

More Thoughts on the Kitchen

Here's our kitchen now:
Look at those horrid beige counters and that atrocious backsplash. You can't see the inside of the cabinets, but they are made of (deteriorating) particle board that really needs replacing. Luckily, the appliances are all new, so we don't have to update those!

And here's how the kitchen will look after the renovation (as per my own brilliant sketch!):

Everything's staying in more or less the same configuration, but we're just updating the way it looks. We also plan on adding drawers instead of the cabinets that currently exist on either side of the oven. The drawers will have organizational racks to help tame the insane tangle of our pots and pans. In a quick, cosmetic change, we'll paint the entire kitchen (and living room, since it's attached) a darker beige to better coordinate than the current pale yellow.

We're hoping these upgrades will make our life here a bit easier and will also help with the resale value of our house down the road. After all, a kitchen is where people gather most, and we want to make our kitchen a living space that works with what we need, rather than against it, like it's currently doing.

Countertops

The fun thing about a kitchen renovation is that you get to think about elements of your kitchen that you'd rarely considered before, such as countertops, pull knobs and tiling.

For our countertops, we know we want a darker color in a solid material. We're considering both the Sensa granite and the Eco line by Cosentino. I love the look of granite, and it is often what potential buyers are looking for...something we have to keep in mind since we do eventually plan on reselling our house (not in the next five years, but eventually). But, recently, more buyers have become more interested in housing that is environmentally friendly, which is where the Eco line would be nice to have. All of the products in this line have at least 75% post-consumer materials, like bottles and mirrors.

We like these two options from the Eco line:
(black forest)

(starlight)

25 May 2011

More Kitchen Thoughts

Another inspiration picture for our kitchen:
This picture is getting REALLY close to what we'll be doing: white cabinets, dark countertops, khaki walls and stainless steel appliances. Our first recon trip to Lowe's happened Monday night...we're getting all sorts of great ideas!

23 May 2011

Kitchen Renovation: The Early Stages

Landon and I have been talking seriously about what it will take (fiscally, mentally and physically) to renovate the kitchen..and it looks like it may all be possible soon. We are SO excited about the prospect of a new kitchen since our current one lacks many of the features we want in a cooking space.

So what are we going for? Something similar to this:
We have a fairly small L-shaped kitchen, so we want to keep things light and airy. We currently have white cabinets, and we're planning on staying with that color. We would like to add darker countertops in the new version of the kitchen, which we think will work well with our stainless steel and black appliances (which were just purchased, so they will stay in the new space). Instead of the painted brick above, we're considering glass subway tiles, possibly in a white or beige. We're going to paint the walls a khaki, so either white or beige tiles would work well within that color scheme.

All we have to do now is really start budgeting...and counting down the days 'til the new space!

11 April 2011

Party lights

I love strings of lights. They remind me of so many fun things: the lights we used to hang off the canopy of my grandparents' motor home when we went camping, summer nights, parties full of laughter and friends.

So, of course, our new house needed some outdoor lights for the patio. And stat, since the weather is quickly turning to Spring!

We found these awesome frosted mini bulbs at Target. They were on sale, so we got a 24-foot string for $10. With just one box, our porch went from being completely boring to looking like party central!


All we need are some guests, some fun music and some tasty food!
The lights at the bottom of the stairs. And yay for our new flowers! Read about our yard facelift over at my other blog, The Adventures of the Vereen-Davises.
Have you made any changes to your outdoor space in preparation for the warmer months?